Table of contents
What is Scenario Management?
Scenario management allows you to manage related networks in a single project. The aim is to model comparable cases in these networks and then compare their simulation results. For each case within a project, you create a separate scenario. You then modify each scenario to meet the requirements of the respective case. Then you configure the desired evaluations and run simulations for the scenarios whose simulation results you want to compare.
Scenario = base network + all related modifications applied consecutively
Therefore:
- If you load a scenario in PTV Vissim, it takes the base network and applies all modifications in the specified order. There is no separate network file (inpx) for the scenario unless you export it.
- A change into the base network = change for all scenarios. It is not recommended to make changes to the base network unless you are sure, that desired changes do not conflict with the modifications (e.g. deleting a link in the base network would not allow to put a signal head on it by a modification created before the base network change).
Tech note: It can be helpful to know that modifications save the new state of an object, not the operation that was applied to get there. For example: if you move a link from A to B then the new position B is saved in the modification M, not the translation vector “B-A”. This makes a difference if – for example – later you move the entire network. Adding modification M to the new base network will still show the link at the absolute position B, not at the new base network position plus (B-A).
Building up the scenarios
There are two ways of building up the scenarios:
Preparing modifications first, then using them as building blocks for scenario definition
This is advantageous and needed if many scenarios are to be built and they share certain modifications.
Building up scenarios naturally by adding and editing the network. Each scenario gets unique modifications.
Usable for a small number of independent scenarios = scenarios don’t have many common parts except the base network.
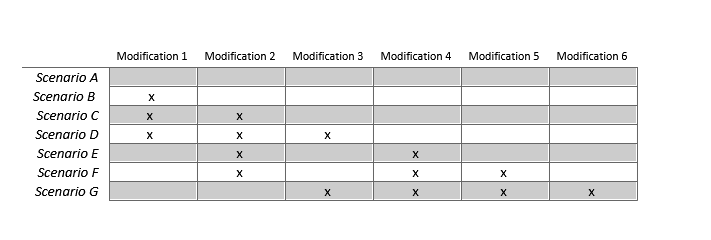
Vissim allows you to perform a check if two modifications are:
- Combinable or … can I use them both together in my scenario?
- Independent … can I use just one of them without the other one in my scenario?
To perform such a check, simply go to the project structure window, table modifications, then select two modifications and click on the correspondent button on the right of the window.
Principles of good practice
- Prepare the base network carefully before you start to develop scenarios.
- Do not change the base network unless you want a change for all scenarios, and you are sure that this change will not conflict with any modification.
- Separate modifications logically. Start a new modification for logically separated changes (e.g. modification 1 = adding bypass, modification 2 = increasing volumes…).
- Name modifications clearly, so you or your colleague or reviewer understand what it does without an extensive investigation.
Viewing/Checking
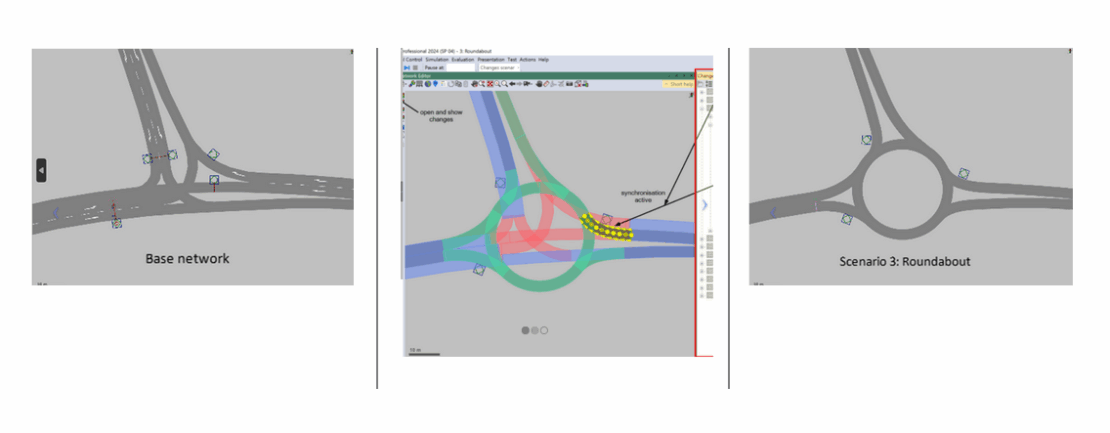
Vissim offers two buttons for seeing changes or performing network comparisons.
This allows you to understand:
- what a single modification does,
- what are the differences between a scenario and the base network (what all modifications related to a specific scenario do together),
- what are the differences between the two scenarios,
- what are the differences between two separate Vissim (inpx) files.
The network editor and the tree view window can be synchronized and show the same color coding: green for added, red for deleted, and blue for modified objects or attributes.

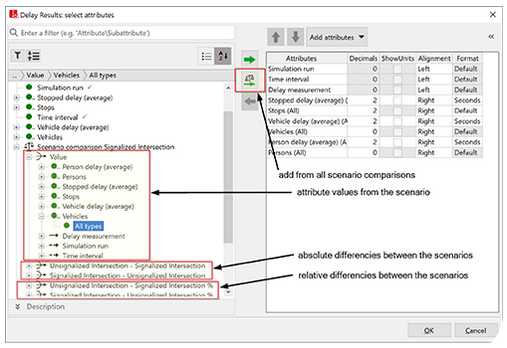
If you did so successfully, the attribute selection dialog will reflect it by showing the attribute values from the compared scenario and the differences between the scenarios.
Comparing results
Imagine all your scenarios are set and you performed the simulations for them. This can be triggered by using the button “Simulate all scenarios”.
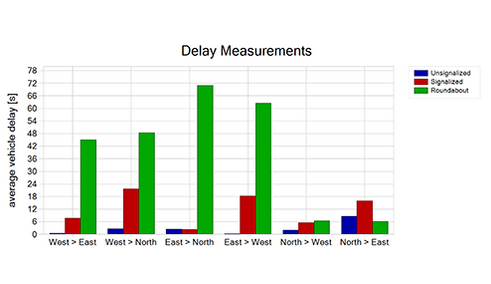
Now is the time to compare the results. If one of the scenarios is loaded, all its result attributes are available in the lists as usual. The results value from other scenarios and comparisons of scenarios can be added to the lists easily by configuring in the project structure dialog – for each scenario you select all scenarios, you want to compare with (e.g. I want to load scenario 1 and compare with scenarios 2 and 3).
Q&A
- I want to hand over one scenario only. How can I do that?
-> Export the scenario from the project structure dialog. See the button “Export selected scenarios” on the right.
The transfer of the entire project, on the other hand, requires the provision of the network file (inpx), the vissimpdb file, and the Modifications and Scenarios subfolders. Simply zip the entire contents of the main folder. - Can I remove something from the modification?
This is possible only if you open the modification in a text editor, look for the corresponding part, and delete it. Only recommended for experienced users who know that there are no other consecutive modifications dependent on the deleted part. Always make a backup copy before such operations. - I have two Vissim network files. How can I find out the differences between them?
Open the first file, then go to the main menu: File > Compare & Transfer Networks > Compare Opened Network with Network file - What is a model transfer file good for?
You can save the differences between two Vissim networks to a model transfer file (*.trax). It is the same format as a modification file so you can apply it to a base network and create a scenario out of it. - I do not want to add changes to an existing modification but to a new one. How can I do that?
Simply select “Modifications” in the project explorer and hit the green plus button – that creates a new modification. Then load that modification (just double-click it) and start putting changes into the modification in the network editor. - Can we work on several scenarios in parallel?
Vissim does not provide such a feature out of the box yet. However, several people can work on a copy of the base network, then create a network transfer file and apply it in a scenario of the project.
Further information on the topic

What is traffic simulation?
Discover the advantages

Advantages of Traffic Simulation
For better decisions in modern mobility solutions.
